Installing
Files structure
- Documentation – folder contains the documentation to this work.
- PSD – folder contains graphic source (mockups) files of the work. They can be needed in case of redesign by other designer.
- HTML – contains the main files of the work: .html, .css, .js etc.
- agency - contains a landing page for agencys.
- css – here you will find theme style sheets.
- fonts – folder contains fonts of the page.
- images – contains images of the page.
- scripts – folder contains scripts which are necessary for correct theme operation (.js, .php, etc.).
- video – contains videos of the page.
- index – it's the main theme file. It combines all the ingredients and can be open with any browser on your computer.
- app1 - contains a landing page for applications.
- app2 - contains a landing page for applications.
- app3 - contains a landing page for applications.
- book - contains a landing page for books.
- business - contains a landing page for business projects.
- coming-soon - contains a "coming soon" landing page.
- consultation - contains a landing page for consultations.
- elearning - contains a landing page for eLearning projects.
- event - contains a landing page for events.
- gym - contains a landing page for gym.
- hosting - contains a landing page for hosting companys.
- promo - contains a landing page for product promotion.
- real-estate - contains a landing page for real estate agencys.
- service - contains a landing page for offline services.
- single-page - contains a single page template.
- web1 - contains a landing page for web services.
- web2 - contains a landing page for web services.
- restaurant - contains a landing page for food industry.
- medicine - contains a landing page for medical institutions.
- shop - contains a landing page for online store.
- 404 - page for 404 error.
- travel - contains a landing page for travel agencys.
- coming-soon-countdown - contains a "coming soon" landing page with date counter.
- ...
- PageBuilder-V4 - Build your landing page in minutes.
- bootstrap - contains basic bootstrap items.
- css - contains custom css.
- elements - contains all blocks.
- fonts - contains the fonts used in Databased.
- images - contains images used in Databased.
- js - contains the javascript files.
- tmp - contains temporary files.
- elements.json - contains the structure of the elements list.
- index.html - main file.
- iupload.php - the upload script.
- preview.php - the preview script.
- save.php - the script for exporting created markup.
- expImp.php - the script for export/import Page Builder projects.
Uploading
After you chose an example suitable you, it is necessary upload all contents of the folder (index.html and the css, scripts, fonts, images folders) on your server. For this purpose you can use online FTP the manager of yours a hosting or use the desktop version (FileZilla for example).
- Enter on the server by means of the manager and choose the necessary folder for downloading.
- Upload the chosen files (index.html and the css, js, fonts and images folders).
- Once the files are done uploading, you can try access your website via browser.
Performance of this operation means that you have the server space and the domain.
Code Structure
HTML Structure
Page is based on latest version of the Bootstrap framework (3.X) and is fully compatible with it. HTML marking of the page consists from 2 the main parts, <Head> and <Body>.
In <Head> we connect all external files which we are necessary for our work of this page (css and by javascript), an also we determine specifications.
To <Body> be in the main content of the page (our blocks with functionality). Each block is marked by special comments at the beginning and at the end (this applies to both html and css files). The general structure <Body>:
                        block code here

                        block code here

                        block code here

                        ...


                        block code here

                        block code here
CSS Structure
Files contained in CSS folder of the Landing Page (and their short description):
- style.css – the main stylesheet. It responds for the appearance of your project.
- iconfont-style.css – stylesheet of icons font.
- magnific-popup.css – stylesheet of "Magnific Popup" script (necessary for pop-ups displaying).
File style.css contains the main styles of your project, its code is structured in the following way:
                        /*--------------------- FONT (OPEN SANS) IMPORT FROM GOOGLE FONTS ----------------------*/


                        /*----------------------------------------------------------------------------------------
														COMMON STYLES
						-----------------------------------------------------------------------------------------*/
                        Common styles

						...

						/*----------------------------------------------------------------------------------------
															SOME SECTION
						----------------------------------------------------------------------------------------*/
						Section styles

                       	...

                        /*----------------------------------------------------------------------------------------
																FOOTER
						----------------------------------------------------------------------------------------*/
						Footer styles
If you want to change a certain section – just find it with the narrative and then change to the style you need (or delete unneeded styles for optimization).
Page Builder
Introduction
What it is Page Builder is a Javascript script which allows publishers of HTML templates to provide their customers with a quick and easy way to customise HTML templates. Page Builder runs (almost) entirely in the browser. The only server side code is in the form of a single PHP file used for exporting HTML markup.
What it's not (!) Page Builder is NOT a CMS (content management system). It does not provide a way for end-users to work on live websites and make changes to such websites.
Before Installing
To be able to use Page Builder, you must have the following:
- PHP
- Apache webserver (Windows servers will probably work, but are not supported)
- An FTP tool to upload the files
Installation
Installing the Page Builder script is simply a matter uploading the script files to a server/hosting account. Once uploaded, point your browser to said server/hosting and your script will work.
Features
Drag and drop
Page Builder allows users to drag HTML elements onto a canvas and drop them where they'd like them to appear. Once dropped onto the canvas, the position can be changed by dragging and dropping as well. Elements can be delete individually or all elements on the current page can be deleted in one go.
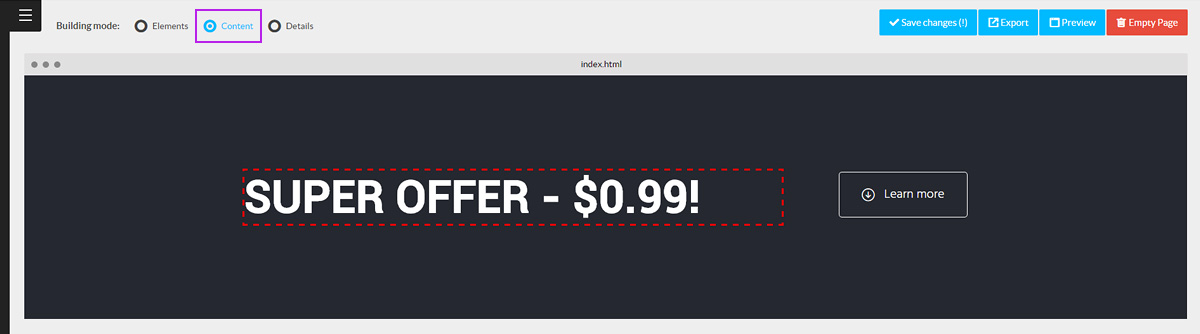
Content editing
The Page Builder script can also be used to edit written content inside each element (simply by setting the "building mode" to "content"). Page Builder uses a rich text editor, allowing to make changes to the written content. Depending on what type of element you're editing, certain options will be disabled in the editor. Editable text elements will need to be configured through "/js/builder.js", and depending on the exact configuration, certain text elements might not be editable.
Style/detail editing
The Page Builder script also allows for basic CSS editing and link editing. Using the built-in CSS editor, end-users can customise whatever CSS attributes the script's admin has configured. When editing a link, the end-user can point the link to either an internal page or an (external) URL.
Link editing
The Page Builder script allows user to edit links as well. To be able to edit links, firstly the link selectors will need to be added to the "editableItems" array in the /js/builder.js file. To edit links on the canvas, firstly select the Details building mode, this will allow you to select links. When selected, a "link" tab will be visible in the left panel, allowing you to either choose a page to link to or enter a URL manually.
Linking within a single page.
When building a one-page website, you might want to link to sections within a single page rather then to a separate page. To do this, simply edit the link and use the second dropdown to choose the block you'd like to link to. The ID's to which can be linked, have to be configured within the block HTML files, and the ID attribute should be assigned to the first child element of the main container (for an example, please have a look at any of the bundled block files).

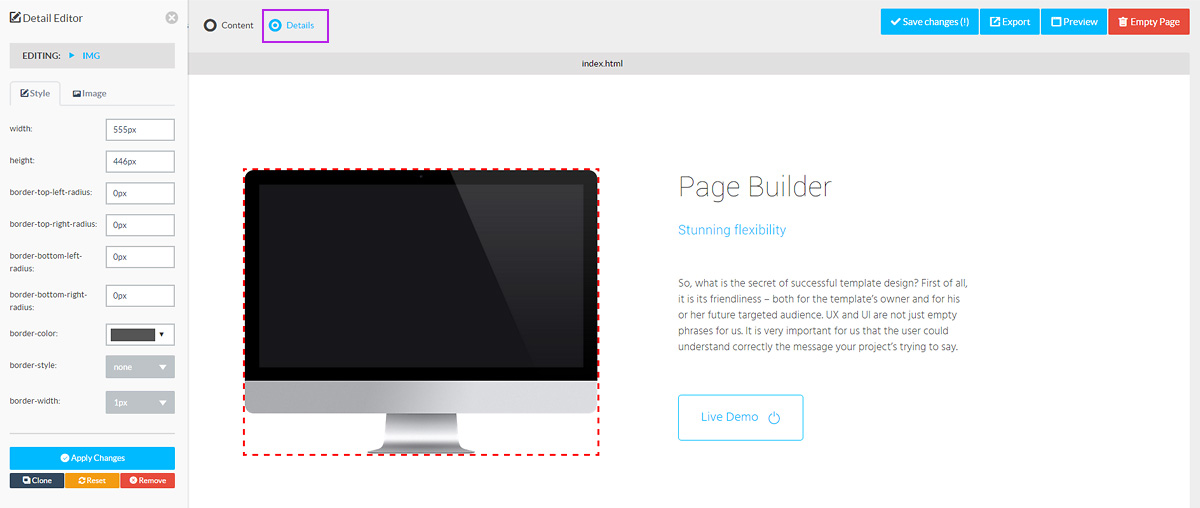
Image editing
The Page Builder script allows user to edit images as well. To be able to edit images, firstly the image selectors will need to be added to the "editableItems" array in the /js/builder.js file. To edit images on the canvas, firstly select the Details building mode, this will allow you to select images. When selected, a "image" tab will be visible in the left panel, allowing you to either upload an image or enter a URL manually.
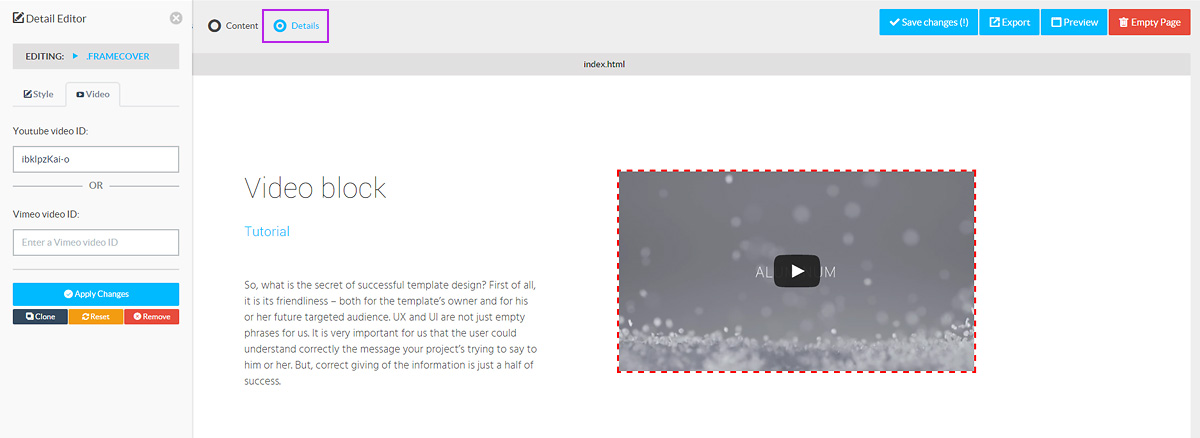
Video editing
Page Builder allows users to edit Youtube and Vimeo videos as well. To edit a video, switch to "Details Mode" and click the video you'd want to edit. This will open the left sidebar panel where you can enter a Youtube video ID or a Vimeo video ID. You can alter between these as you please, the application will detect which platform you're using and update the video accordingly.
Icon editing
The Page Builder script allows user to edit icons as well (the script allows you to use all icons available in the LineIcons+Icomoon Font collection). To be able to edit icons, firstly the icon selectors will need to be added to the "editableItems" array in the /js/builder.js file. To edit icons on the canvas, firstly select the Details building mode, this will allow you to select icons. When selected, a "icon" tab will be visible in the left panel, allowing you to choose any item from the Font Icon collection.

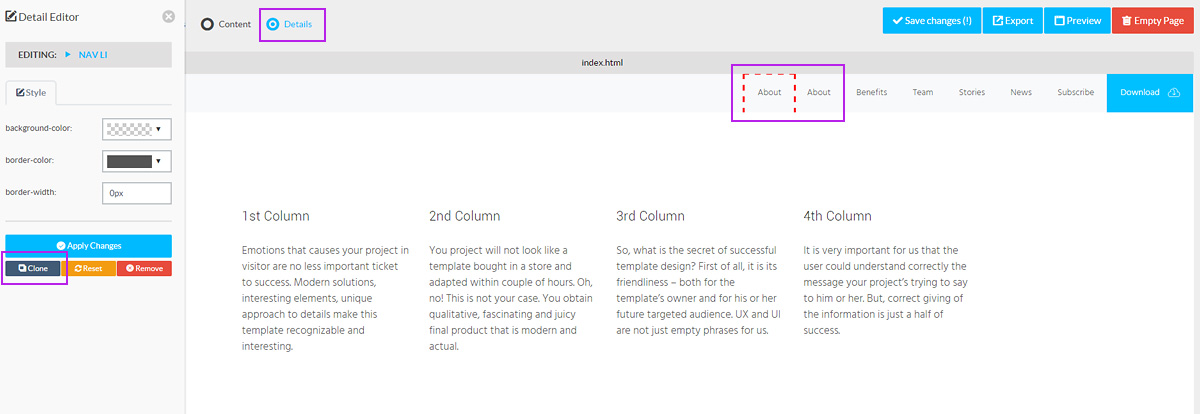
Cloning items
Items which have been setup in the "editableItems" array in /js/builder.js can be cloned. Switch to "Details" building mode, select the item which you want to clone and finally click the clone button from the left panel. Please note that cloned items will be inserted into the canvas right next to the original item.
In some situations, you might want to have the parent of the original item cloned, rather then the item itself. Consider the example of an unsorted list with "a" tags inside "li" tags. In this case, it's the containing "li" element which should be cloned, not the "a" element itself. To make this happen, make sure to add the class name "propClone" to the parent element in your element's .html file.
Export HTML
Whenever the user is happy with the final result, the created markup can be exported by click the blue export button. The export feature will grab all the used HTML elements for each created page and inserts these elements into a copy of the HTML skeleton file. Once all pages are completed, all the HTML files are bundled into a ZIP archive together with the other external resources like stylesheets, Javascript files and images (as configured through the "save.php" file) which will be downloaded by the end user.

Pages
The Page Builder script allows users to create multiple pages at once. To add a new page, simply click the green button labeled "+ Add" just below the current pages list. You can alter the page names as well (please use names with the .html extension, these are added automatically during the export). When exporting the markup, the pages will use the same names. To delete a page, simply click the little delete icon next to the page you'd like to delete.

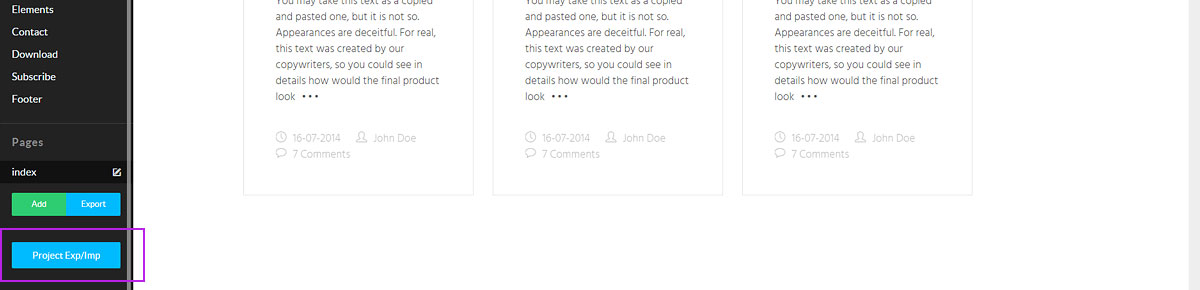
Export/Import project
Now you can save your project. Just click on the "Project Exp/Imp" button and in the popup that appears, select a desired action. With the export project, you can save your page and also easily import them later. The project is stored in its own expansion ".pbproject". Also you should remember that after the import process all the current landing pages will be deleted!
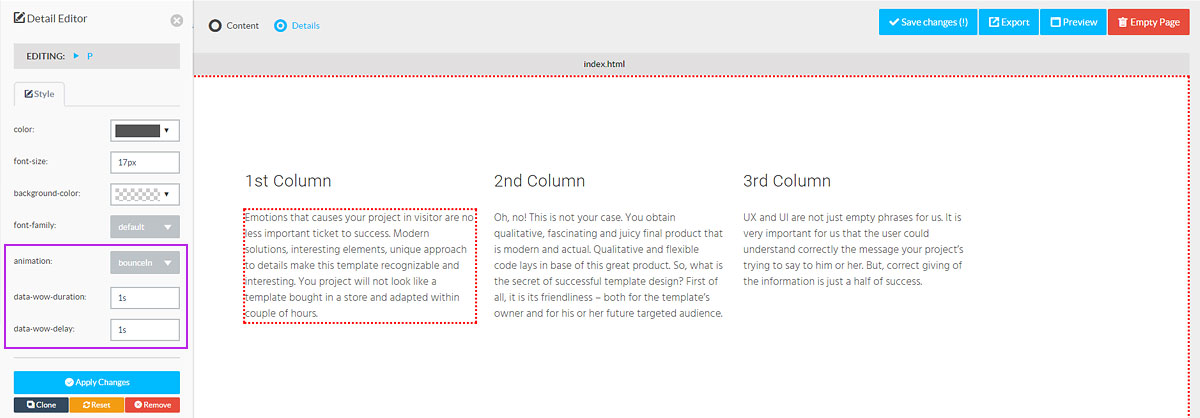
Element's Animation
Since the second version, you can add CSS3 animation to your pages. Simply select the type of animation (in detail all types of animation you can see here) delay and duration. These values are measured in seconds and in the case of integers using a dot.
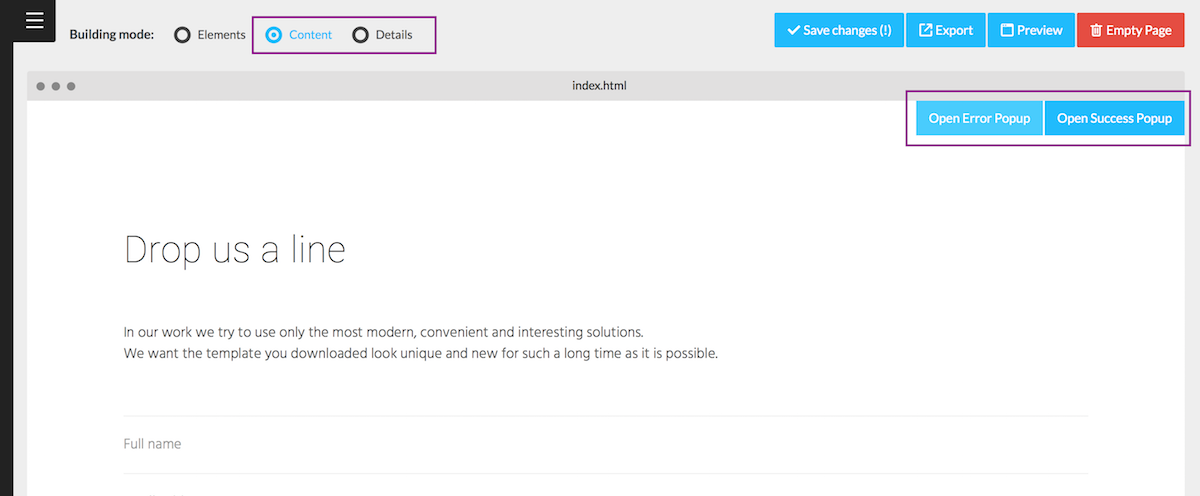
Modal PopUps
Starting from version 5 you can open and edit confirm popups and modal popups. In order to open modal popup choose "content" or "Details" mode and on section hover (in right top corner) you can see open button.
Upgrading from V4 to V5
MAKE A BACKUP BEFORE UPDATING!!
Version 5 brings a lot of changes, so I advise you to simply install the builder again.
But if you want, for whatever reason, keep the previous one - use chatlog list below.
Replace modified files:
- index.html
- save.php
- css/*.css
- elements.json
- elements/*.*
- js/builder.js
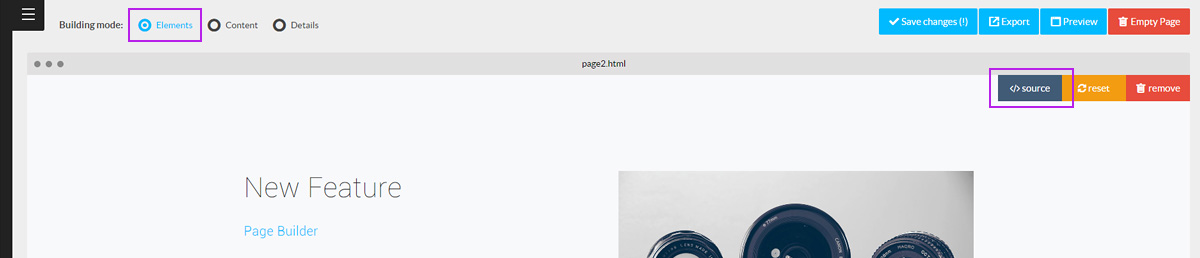
Page Customization
You can easily change section's code in PageBuilder. Use source code editor to do it.
Color Gamma.
Template is included 2 color gammas (dark and light). Default setting is light gamma. But if you use a dark background, you'd better choose the dark gamma for this section. Just add class "dark-bg" (see example below).
Also template has preinstalled background colors classes:
- bg-color1 - dark background (by default: #252830);
- bg-color2 - bright background (by default: #00c0ff);
- bg-color3 - light background (by default: #f8f9fb).
<!-- FOOTER -->
<footer id="footer" class="bg-color1 dark-bg">
	<div class="container">
		<div class="row">
Navbar.
In order to change the navigation bar type you need to open index.html code and find navigation section (tag <nav>).
Using classes you can change the type of navbar (see types below).
Fixed top navbar.
To make navigation fixed to the top you need to add the following classes: "navbar-fixed-top" (example below).
<!-- NAVIGATION -->
<nav class="navbar bg-color1 dark-bg navbar-fixed-top">
Sliding on scroll navbar.
To make navigation sliding on scroll you need to add the following classes: "navbar-fixed-top navbar-slide" (example below).
<!-- NAVIGATION -->
<nav class="navbar bg-color1 dark-bg navbar-fixed-top navbar-slide">
Transparent navbar.
To make navigation transparent you need to add the following classes: "navbar-fixed-top navbar-slide navbar-transparent" (example below).
<!-- NAVIGATION -->
<nav class="navbar bg-color1 dark-bg navbar-fixed-top navbar-slide navbar-transparent">
Logotype.
In order to add your logo, you need to open index.html file code, find the code you see below and change default data to yours.
Or just change the logo image in a folder with pictures (the picture size must be identical, if it is not – change the size in index.html page code).
<!-- NAVIGATION -->
<nav class="navbar bg-color1 dark-bg navbar-fixed-top navbar-slide navbar-transparent">
	<div class="container"> <a class="navbar-brand goto" href="#"><img src="./images/logo.png" height="25" alt="Your logo"></a>
Mobile Menu Toggle Button.
If you want to change the type of toggle button, you need to open html file, find a button code (look below) and add or dele class "round-toggle".
<!-- NAVIGATION -->
	<nav class="navbar navbar-fixed-top navbar-slide">
		<div class="container">
			<a class="navbar-brand goto" href="#"><img src="./images/logo.png" alt="Your logo" height="30" width="30" /></a>
			<button class="round-toggle navbar-toggle menu-collapse-btn collapsed" data-toggle="collapse" data-target=".navMenuCollapse"> <span class="icon-bar"></span> <span class="icon-bar"></span> <span class="icon-bar"></span> </button>
			<div class="collapse navbar-collapse navMenuCollapse">
Video background: settings.
If you want to change the settings of video background, you need to open custom.js file, find a background code (look below) and change the settings you need.
//------------------------------------------------------------------------
//						VIDEO BACKGROUND SETTINGS
//------------------------------------------------------------------------
	$(function() {
    	var BV = new $.BigVideo({container: $('.block-video-bg'), useFlashForFirefox:false});
    	BV.init();
		if(navigator.userAgent.match(/iPhone|iPad|iPod|Android|BlackBerry|IEMobile/i)) {
                BV.show('images/video_gag.jpg');
        } else{
			if (!!window.opera || navigator.userAgent.indexOf(' OPR/') >= 0) {
				BV.show('video_bg.ogv', {doLoop:true, ambient:true});
			} else{
				BV.show('video_bg.mp4', {doLoop:true, ambient:true, altSource:'video_bg.ogv'});
			}
			BV.getPlayer().on('loadedmetadata', function(){
   	 			$('#big-video-wrap video').fadeIn('slow');
			});
		}
	});
also you can play a series of ambient background videos
$(function() {
    var BV = new $.BigVideo();
    BV.init();
    BV.show(['vid1.mp4','vid2.mp4','vid3.mp4'],{ambient:true});
});
Contact form: settings.
Insert of your e-mail address.
Open the script of contact form data sending (scripts/contact.php) and type your e-mail address into "$to" field (look below).
<?php
if ($_SERVER['REQUEST_METHOD'] == 'POST') {
    if(!empty($_POST['contactname']) && !empty($_POST['contactemail']) && !empty($_POST['contactmessage'])) {
	$to = 'your@email.com'; // Your e-mail address here.
	$body = "\nName: {$_POST['contactname']}\nEmail: {$_POST['contactemail']}\n\n\n{$_POST['contactmessage']}\n\n";
	mail($to, "Message from yoursite.com", $body, "From: {$_POST['contactemail']}"); // E-Mail subject here.
    }
}
?>
Extension of contact form with additional field.
1. Add a new field code into HTML page code (look below).
<form action="scripts/contact.php" role="form"  id="contact_form">
	<div class="form-group">
		<input type="text" class="form-control" id="contact_name" placeholder="Full name" name="name">
	</div>
	<div class="form-group">
		<input type="text" class="form-control" id="contact_new_field" placeholder="Your new field" name="new_field">
	</div>
	<div class="form-group">
		<input type="email" class="form-control" id="contact_email" placeholder="Email Address" name="email">
	</div>
2. Update a validation script of contact form in custom.js file (look below), add a validation rule and error message.
//------------------------------------------------------------------------------------
//						CONTACT FORM VALIDATION'S SETTINGS
//------------------------------------------------------------------------------------
    $('#contact_form').validate({
        onfocusout: false,
        onkeyup: false,
        rules: {
            name: "required",
            message: "required",
			new_field:"required",
            email: {
                required: true,
                email: true
            }
        },
        errorPlacement: function(error, element) {
            error.insertAfter(element);
        },
        messages: {
            name: "What's your name?",
            message: "Type your message",
			new_field:"New field error message",
            email: {
                required: "What's your email?",
                email: "Please, enter a valid email"
            }
        },
3. Update a script of contact data transmission in custom.js file (look below), add data transmission of a new field.
    $('#contact_form').submit(function() {
        // submit the form
        if($(this).valid()){
            $('#contact_submit').button('loading');
            var action = $(this).attr('action');
            $.ajax({
                url: action,
                type: 'POST',
                data: {
                    contactname: $('#contact_name').val(),
                    contactemail: $('#contact_email').val(),
					contactnewfield: $('#contact_new_field').val(), //ID from html page
                    contactmessage: $('#contact_message').val()
                },
4. Update a script of contact data transmission onto contact.php server (look below), add a variable of a new field.
<?php
if ($_SERVER['REQUEST_METHOD'] == 'POST') {
    if(!empty($_POST['contactname']) && !empty($_POST['contactemail']) && !empty($_POST['contactmessage']) && !empty($_POST['contactnewfield'])) {
	$to = 'your@email.com'; // Your e-mail address here.
	$body = "\nName: {$_POST['contactname']}\nEmail: {$_POST['contactemail']}\n\n\n{$_POST['contactmessage']}\n\n{$_POST['contactnewfield']}\n\n";
	mail($to, "Message from yoursite.com", $body, "From: {$_POST['contactemail']}"); // E-Mail subject here.
    }
}
?>
Subscription: settings.
In order to customize a subscription through Mailchimp, you need to create a new account and get your own apiKey and listID. Then you need to add these data ina subscription script, "subscribe.php" file (look below). Do not forget to change Datacenter to yours. You can learn your DataCenter from apiKey (for example: us-3). To customize the 2 fields subscribe form, open the file "subscribe-2.php" and do the same.
<?php
$apiKey = ''; // your mailchimp API KEY here
$listId = ''; // your mailchimp LIST ID here
$double_optin=false;
$send_welcome=false;
$email_type = 'html';
$email = $_POST['newsletter_email'];
$submit_url = "http://us3.api.mailchimp.com/1.3/?method=listSubscribe"; //replace us2 with your actual datacenter
Coming Soon: countdown settings.
If you want to change the settings of countdown, you need to open custom.js file, find a background code (look below) and change the settings you need.
//------------------------------------------------------------------------
//						COUNTDOWN OPTIONS SCRIPT
//------------------------------------------------------------------------
    $('.countdown').jCounter({
        date: "14 february 2016 12:00:00", // Deadline date
        timezone: "Europe/Bucharest",
        format: "dd:hh:mm:ss",
        twoDigits: 'on',
        fallback: function() {console.log("count finished!")}
    });
Portfolio: add media item (video or map).
If you want add iFrame (video or map) to the portfolio you need add class "mfp-iframe" to the item's link.

Font Icons exchange.
All 300 simple line icons are now embedded in a webfont for more convenient use on the web or in a native application. Big thanks to Jamal Jama for creating this awesome webfont.
To change an icon to one you need - just change a class of this icon.
For example: you can see below an element with "icon-notebook2" class. In order to change this icon – choose the icon you need from this list and put its class instead of "icon-download".
<div class="col-md-3">
	<i class="icon icon-notebook2"></i>
	<h3 class="timer">256</h3>
	<h4>Dishes</h4>
</div>
Full Height Section.
if you want the height of the section was equal to the height of your display - add class "screen-height" to this section.
<!-- 404 ERROR BLOCK -->
<section id="error-404" class="cover-bg no-sep screen-height" style="background-image:url(images/bg51.jpg)">
       <div class="container">
           <div class="row">
               <div class="col-md-12">
Portfolio Link Item.
If you want to an element of the portfolio not zooming, but linked to another page - you need to add to the tag class "link-item". See below.
<ul class="portfolio-list portfolio-4col">
	<li>
		<a href="./images/screens/screen-shop1.jpg" title="Description" class="link-item">
			<span class="label label-warning">50% OFF</span>
			<span><i class="icon center-icon icon-magnifier-add"></i></span>
			<img src="images/screens/screen-shop1.jpg" alt="">
		</a>
		<div class="desc">
			<a href="#" class="btn btn-sm btn-primary"><i class="icon icon-basket"></i>Buy</a>
			<span class="name">Dress Less</span>
			<span class="price">$14.00<del>$28.50</del></span>
		</div>
	</li>
Mockups.
To add the image of your product (application or site) easy, we prepared new mockups.
All you need is to open PSD file with a mockup needed and add there a screenshot of your product. Also you can choose different types of device in PSD file (if this option is provided), for instance, phone with different OS. All mock-ups are kept in PSD folder (in archive root).
Scripts
Files contained in SCRIPTS folder (and their short description):
- сustom.js – file contains all the specific settings of scripts attached, and also small self-made scripts.
- bootstrap.min.js – contains the functions of bootstrap framework.
- jquery.validate.min.js – validation script.
- jquery-1.11.2.min.js – JavaScript library. Very important file, don't delete.
- waypoints.min.js – Waypoints is the easiest way to trigger a function when you scroll to an element.
- jquery.counterup.min.js – Counter-Up is a lightweight jQuery plugin that counts up to a targeted number when the number becomes visible.
- html5shiv.js – provides basic HTML5 styling for Internet Explorer 6-9, Safari 4.x (and iPhone 3.x), and Firefox 3.x.
- respond.min.js – a fast & lightweight polyfill for min/max-width CSS3 Media Queries (for IE 6-8, and more).
- placeholders.jquery.min.js - a script for browsers not supporting placeholder property.
- jquery.smooth-scroll.min - Automatically make same-page links scroll smoothly.
- smoothscroll.js - SmoothScroll for websites.
- bigvideo.js - This plugin makes it easy to add fit-to-fill background video to websites.
- video.js - The open source HTML5 video player.
- jquery.magnific-popup.min.js – Fast, light and responsive lightbox plugin, for jQuery and Zepto.js.
- subscribe.php – script for subscription through Mailchimp.
- subscribe-2.php – script for subscription through Mailchimp (2 fields form).
- jquery.jCounter-0.1.4.js – script for coming soon countdown.
- contact.php – script for data sending from contact form.
PSD files
Files contained in PSD folder (and their short description):
- app-bg-mockup.psd - mockup background for App page (example "App1" page).
- browser-mockup.psd - mockup of the browser window (example "web1" and "web2" pages).
- couple-phones-mockup.psd - couple phones mockup (each contain Android, WindowsPhone and iOs versions).
- intro-phones-mockup.psd - mockup of phones at an angle (example "App1" page).
- desktop-mockup.psd - desktop screen mockup.
- wide-desktop-mockup.psd - desktop screen mockup (top view).
- phone-mockup.psd - single phone mockup (contain Android, WindowsPhone and iOs versions).
Credits
The following materials were used in order to create this work (we’d like to say that we are much obliged to their developers):
- jQuery http://jquery.com/
- Bootstrap http://getbootstrap.com
- Simple Line Icons Webfont http://graphicburger.com/simple-line-icons-webfont
- IcoMoon https://icomoon.io/
- jQuery Validation http://jqueryvalidation.org
- SmoothScroll.js https://gist.github.com/galambalazs/6477177
- jQuery-smooth-scroll https://github.com/kswedberg/jquery-smooth-scroll
- BigVideo.js https://github.com/dfcb/BigVideo.js
- Placeholders.js http://jamesallardice.github.io/Placeholders.js/
- Waypoints http://imakewebthings.com/waypoints/
- Counter-Up https://github.com/bfintal/Counter-Up
- Page Builder (Front-End Version) http://codecanyon.net/item/html-builder-frontend-version/8432859
- GraphicBurger http://graphicburger.com/
- Night City Traffic http://videohive.net/item/night-city-traffic/10691103
- jquery.jCounter-0.1.4.js https://github.com/catalinberta/jCounter
- animate.css https://daneden.github.io/animate.css/
- wow.js http://mynameismatthieu.com/WOW/
- audio.js http://kolber.github.io/audiojs/
- goodshare.ru http://goodshare.ru